まえがき
※【2025/2/28 追記】続きを書きました
【Claude 3.7】Go言語でwasmのサンプルプログラムをAIに作らせて動かしてみる
Go言語でボール落下アニメーションのプログラムを書き、Wasmにコンパイルしてブログ上で動かしてみました。
「Start」ボタンを押下すると、Wasmファイルがダウンロードされ、プログラムが実行されます。
tinygoを使用した場合、非圧縮では約200KB、gzipで圧縮すると約80KB程度のファイルサイズになりました。
ブログに載せるには結構大きめのファイルサイズになってしまいますが、許容範囲かなと思います。
そもそも単純なプログラムで使用するパッケージは3種類のみのため、ファイルサイズが小さくなるのは当然ですが、
さまざまな機能を実装すると、圧縮しても1MBを超えてくるでしょう。
ちなみに有名なWebサービスであるFigmaもwasmを使用しています。
Figmaで使用されているwasmのサイズは約9MBでした。
ボール落下アニメーションの作り方
では作り方について解説していきます。
以下で作成するファイルは全てwasm-testフォルダ直下に作成してきます。
$ mkdir wasm-test
$ cd wasm-test
まずは、ボール落下アニメーションのプログラムをGo言語で作成します。
// main.go
package main

import (
	"math/rand/v2"
	"syscall/js"
	"time"
)

type Ball struct {
	X, Y   float64
	VY     float64
	Radius float64
	Color  string
}

var (
	canvas  js.Value
	ctx     js.Value
	balls   []Ball
	gravity float64 = 0.5 // 重力加速度
	ground  float64 = 300 // 地面の位置
	width   float64 = 500 // キャンバスの幅
	height  float64 = 400 // キャンバスの高さ
)

// 物理演算の更新処理
func updatePhysics() {
	for i := range balls {
		balls[i].VY += gravity // 重力の影響を適用
		balls[i].Y += balls[i].VY

		// 地面に衝突した場合
		if balls[i].Y > ground-balls[i].Radius {
			balls[i].Y = ground - balls[i].Radius
			balls[i].VY = -balls[i].VY * 0.7 // 反発係数
		}
	}
}

// 描画処理
func draw() {
	// キャンバスをクリア
	ctx.Call("clearRect", 0, 0, width, height)

	// 各ボールを描画
	for _, ball := range balls {
		ctx.Call("beginPath")
		ctx.Call("arc", ball.X, ball.Y, ball.Radius, 0, 2*3.1415926535)
		ctx.Set("fillStyle", ball.Color)
		ctx.Call("fill")
	}
}

// requestAnimationFrame のコールバック関数
func render(this js.Value, args []js.Value) interface{} {
	updatePhysics()
	draw()
	js.Global().Call("requestAnimationFrame", js.FuncOf(render))
	return nil
}

func main() {
	r := rand.New(rand.NewPCG(uint64(time.Now().UnixNano()), 3))

	// HTML の canvas 要素を取得
	document := js.Global().Get("document")
	canvas = document.Call("getElementById", "myCanvas")
	if canvas.IsUndefined() {
		js.Global().Call("alert", "Canvas要素が見つかりません!")
		return
	}
	ctx = canvas.Call("getContext", "2d")

	// ボールを複数追加
	for i := 0; i < 5; i++ {
		xx := r.Float64()
		rr := r.Float64()
		balls = append(balls, Ball{
			X:      xx*(width-40) + 20, // ランダムなX座標
			Y:      0,                  // 最初は上部
			VY:     0,                  // 初速度ゼロ
			Radius: 10 + rr*10,         // 10~20px のランダムな半径
			Color:  randomColor(r),
		})
	}

	// アニメーション開始
	js.Global().Call("requestAnimationFrame", js.FuncOf(render))

	// 永久ループ
	select {}
}

// ランダムな色を生成する関数
func randomColor(r *rand.Rand) string {
	colors := []string{"red", "blue", "green", "purple", "orange"}
	return colors[r.IntN(len(colors))]
}
次に、上記Wasmプログラムをフェッチして実行するHTMLを作成します。
<!DOCTYPE html>
<html>
<head>
  <meta charset="utf-8">
  <title>Go WebAssembly 落下アニメーション</title>
</head>
<body>
  <canvas id="myCanvas" width="500" height="400"></canvas>
  <script src="wasm_exec.js"></script>
  <script>
    // Go の WebAssembly ランタイムの初期化
    const go = new Go();
    // main.wasm を非同期で読み込み、実行する
    WebAssembly.instantiateStreaming(fetch("main.wasm"), go.importObject).then((result) => {
      go.run(result.instance);
    });
  </script>
</body>
</html>
次に、Wasmをロードして実行するための tinygo 用のJSファイル(wasm_exec.js)をカレントディレクトリにダウンロードします。
以下のコマンドを実行してください。
$ docker run -v "$(pwd)":/go -e "GOPATH=/go" tinygo/tinygo:0.36.0 /bin/bash -c "cp /usr/local/tinygo/targets/wasm_exec.js /go/"
実行後、wasm_exec.jsがカレントディレクトリに作成されていればOKです。
注意点
このwasm_exec.jsはtinygo 0.36用のものになっています。goの公式の方を使用するとWebAssembly.instantiate(): Import #0 module="wasi_snapshot_preview1" error: module is not an object or functionというエラーになってしまうので、tinygo 0.36専用のwasm_exec.jsを使用しましょう。
tinygoでWasmのバイナリを作る
では、tinygoを使ってコンパイルする手順を説明します。
なお、Goのバージョンによってはコンパイルエラーになる場合があるためできれば1.24.0を使用してください。
まず、tinygo 0.36をダウンロードしインストールします。(Ubuntu環境の場合)
wget https://github.com/tinygo-org/tinygo/releases/download/v0.36.0/tinygo_0.36.0_amd64.deb
sudo dpkg -i tinygo_0.36.0_amd64.deb
次に、プロジェクトを初期化します。
$ go mod init wasm-test
そして、tinygoでコンパイルします。
tinygo build -o main.wasm -target wasm .
これで、main.wasmが生成されます。
ファイル構成は以下のようになっているはずです。
$ tree wasm-test
wasm-test
├── go.mod
├── index.html
├── main.go
├── main.wasm
└── wasm_exec.js

0 directories, 5 files
では、ローカル環境でWebサーバーを立ち上げて動作確認をしてみましょう。
Pythonで簡易的なWebサーバーを起動します。
python3 -m http.server 8080
サーバー起動後、http://localhost:8080
にアクセスします。
下記画像のようにランダムな色のボールが落下してくる画面が表示されたら成功です。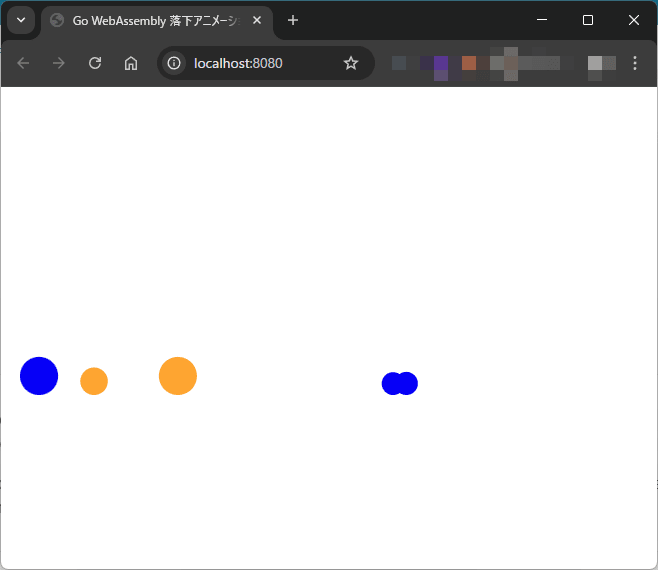
あとがき
思ったより簡単に動作したので、かなり作りやすくなっていると感じました。
今後は、Goの勉強も兼ねて、さまざまな機能を少しずつ追加していく予定です。
本記事が何かしらの参考になれば幸いです。
記事内容についてご不明な点がございましたら、下記のXアカウントまでお気軽にDMしてください。
もふもふ-Xアカウント